Choosing the Right ZIP WIRE KIT for Your Backyard
Venturing into the world of zip lining can be an exhilarating experience, making it a perfect outdoor activity for families and thrill-seekers alike. Before you can take the plunge, it’s crucial to understand the various options available when selecting a ZIP WIRE KIT. Whether you’re constructing a mini-adventure park in your backyard or seeking a reliable zip line setup for your children’s enjoyment, this guide will help you choose the best kit to suit your needs. For those interested in more options, check out this ZIP WIRE KIT resource for guidance and products.
Understanding Different ZIP WIRE KIT Options
There are several types of ZIP WIRE KITS available on the market, each catering to specific needs and experiences:
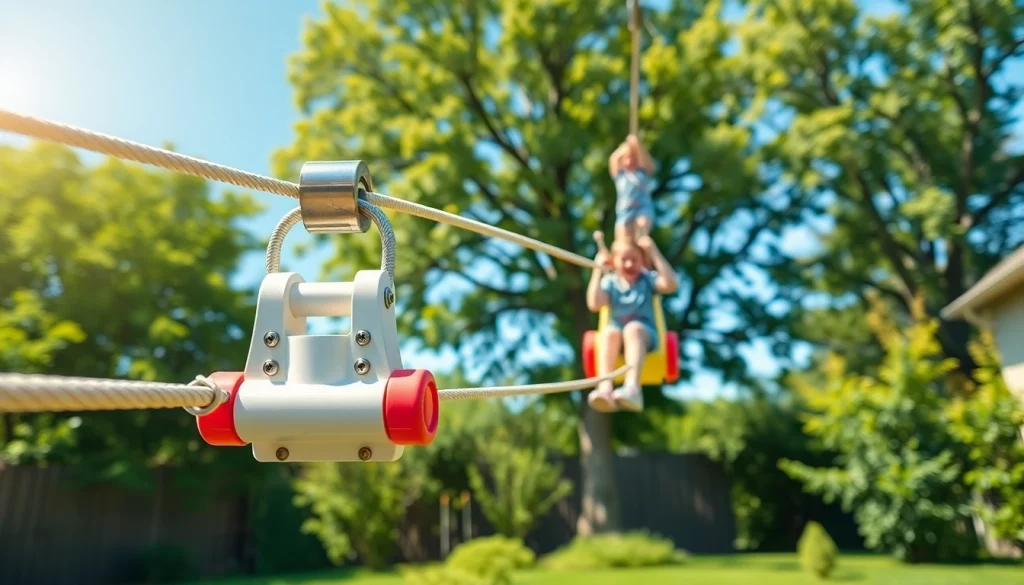
- Residential Kits: Ideal for backyard setups, these kits typically include trolleys, harnesses, and cables. They are designed for lighter use and are easily installed.
- Commercial Kits: More robust than residential kits, these are built to handle heavier weight limits and increased usage—perfect for adventure parks and larger installations.
- DIY Kits: For the hands-on enthusiast, DIY kits provide flexibility in installation. Users can choose their materials, ensuring custom setups. However, they require a degree of skill and commitment to implement safely.
- Complete Packages: These kits often come with everything needed for installation and use, including safety gear, making them a convenient choice for novices.
Factors to Consider When Selecting a ZIP WIRE KIT
When choosing a ZIP WIRE KIT, consider the following aspects:
- Weight Capacity: Each kit will have a maximum recommended weight. Make sure to choose a kit that can support all potential users.
- Length and Distance: The length of the zip line will dictate how much space you need. Take into account your backyard layout and choose a length that fits comfortably.
- Material Quality: Look for kits made from durable materials that can withstand outdoor conditions. Stainless steel trolleys and UV-resistant cables are good signs of quality.
- Safety Features: Ensure the kit includes safety features such as harnesses, helmets, and braking systems to enhance security during use.
- Ease of Installation: Check the assembly instructions and required tools for the ZIP WIRE KIT. Some kits are easier to install than others.
Common Mistakes to Avoid with ZIP WIRE KIT Selection
When purchasing a ZIP WIRE KIT, it’s easy to make a few common pitfalls:
- Ignoring Weight Limits: Always adhere to the recommended weight restrictions to avoid safety hazards.
- Overlooking Safety Gear: Failing to purchase or use necessary safety gear can lead to accidents. Always prioritize safety when engaging in zip lining.
- Not Considering Space: It’s crucial to measure your available space accurately before purchasing. Ensure you have sufficient clearance for both the ride and takeoff/landing zones.
- Being Lured by Inexpensive Options: While budget is essential, compromising on quality may lead to safety issues down the line. Always invest in a reputable kit.
Safety Guidelines for Using a ZIP WIRE KIT
Safety should always be the top priority when using a ZIP WIRE KIT. Implementing proper safety measures can prevent accidents and ensure a fun experience for everyone involved.
Essential Safety Gear for ZIP WIRE KIT Activities
When operating a ZIP WIRE KIT, specific safety gear should be used to protect participants:
- Helmet: A sturdy helmet protects the head from potential impacts.
- Harness: A securely fitted harness is crucial for securing the rider to the zip line.
- Gloves: Protective gloves offer a better grip on the harness and trolley, preventing slippage during rides.
- Closed-Toe Shoes: Appropriate footwear can prevent injuries and ensure stability during takeoff and landing.
Step-by-Step Guide to Safe Installation of a ZIP WIRE KIT
1. Choose the Right Location: Make sure the area is free from trees, buildings, and overhead structures. You should have adequate space for both the start and finish points of the zip line.
2. Gather the Required Tools: Prepare the necessary equipment, including a power drill, wrench, and measuring tape. Refer to the installation guide for specific tool requirements.
3. Set Up the Anchor Points: Securely fasten your anchor points to robust trees or structures as per the manufacturer’s instructions. Ensure both ends of the zip line are securely anchored.
4. Attach the Cable: Following the instructions, attach the cable to both anchor points, ensuring it is level and secure. Adjust tension as needed to avoid sagging.
5. Install the Trolley: Attach the trolley to the cable. Test its movement to make sure it’s operating smoothly without obstructions.
6. Install the Safety System: If your kit includes a braking system, follow installation guidelines closely to ensure it functions correctly.
7. Test the Installation: Before allowing others to use the zip line, perform a safe test run with a sandbag or similar weight to check for stability and safety.
Monitoring Safety While Using a ZIP WIRE KIT
After your ZIP WIRE KIT is installed, consistent monitoring is essential:
- Regular Checks: Frequently inspect the zip line for wear and tear, checking the cable, attachments, and safety gear.
- Pre-Ride Safety Briefing: Always review safety protocols with users, highlighting proper usage and emergency procedures.
- Limit Users at Once: To ensure safety, limit the number of participants using the zip line at any given time.
- Age and Weight Restrictions: Enforce guidelines regarding who can use the zip line based on age and weight limits.
Installing Your ZIP WIRE KIT: A Comprehensive Guide
Installing a ZIP WIRE KIT can vary from simple to complex depending on the model and location. Here’s a detailed approach to ensure a smooth installation process.
Required Tools and Materials for ZIP WIRE KIT Installation
The tools and materials you’ll need may include:
- Power drill with drill bits
- Measuring tape for accurate placements
- Wrenches and socket sets for tightening bolts
- Safety gear including helmets and harnesses
- Leveling tool to ensure a straight installation
- Your specific ZIP WIRE KIT components as per manufacturer’s instructions
Step-by-Step Installation Instructions for Your ZIP WIRE KIT
Follow these detailed installation steps to set up your ZIP WIRE KIT:
- Identify a suitable location for installation.
- Measure the distance between anchor points, ensuring it fits the specified length of your chosen kit.
- Securely fasten the anchor points, making sure they can withstand the dynamic stress of the zip line.
- Attach the cable to both anchors, ensuring it has the right tension without excessive sagging.
- Install the trolley on the cable, confirming it moves freely.
- Attach safety features according to the manufacturer’s guidelines.
- Perform a test run using a weighted object.
Common Installation Challenges and Solutions for ZIP WIRE KIT
During installation, several issues may arise. Here are common challenges and solutions:
- Installation Location Too Close to Ground: If the zip line is too low, it can cause safety issues. Consider adjusting the height of the anchor points for a better ride.
- Insufficient Cable Tension: If the line sags, it could be dangerous. Readjust the anchors to increase tension and eliminate slack.
- Pulley Jamming: If your trolley stops working smoothly, check for debris on the cable. Regular maintenance is crucial to keep it operational.
Maintaining Your ZIP WIRE KIT for Longevity
Once your ZIP WIRE KIT is installed, proper maintenance ensures it remains safe and functional for years to come. Adhering to maintenance best practices can prevent accidents and prolong the longevity of your kit.
Regular Inspection Tips for Your ZIP WIRE KIT
Conducting regular inspections of your ZIP WIRE KIT can help identify wear and tear before it leads to failure:
- Inspect the cable for fraying or signs of damage.
- Check connection points and anchors for rust or looseness.
- Look at the trolley mechanism to ensure it is functioning properly.
- Review the safety gear and replace any damaged equipment promptly.
Maintenance Tasks to Ensure Your ZIP WIRE KIT Stays Safe
Routine maintenance tasks include:
- Cleaning the cable and pulley to prevent degradation.
- Keeping hardware tightened and secure.
- Monitoring environmental factors that could affect equipment integrity, such as weather conditions.
Weather Considerations for Your ZIP WIRE KIT Care
Weather conditions can impact the performance and durability of your zip line:
- Rain: Excessive moisture can lead to rust. Regularly dry off metal components and apply protective coatings.
- Wind: Strong winds may pose risks. If heavy winds are forecasted, it’s advisable to remove or secure the trolley.
- Sun Exposure: UV rays can degrade materials over time. Consider using protective coverings for extended periods of non-use.
Unleashing Fun with Creative Uses of Your ZIP WIRE KIT
A zip line is not just a piece of equipment; it’s an opportunity for creativity and family bonding. Here are engaging ideas to make the most of your ZIP WIRE KIT.
Incorporating Games and Activities with Your ZIP WIRE KIT
Make the zip line more exciting by integrating various games and activities:
- Timed Races: Set up a challenge where participants race to the end of the zip line.
- Obstacle Courses: Pair the zip line with other backyard activities to create a fun-filled obstacle course.
- Team Challenges: Form teams that compete in zip line runs, incorporating additional tasks at each end of the line.
Engaging the Family in Exciting Ways with Your ZIP WIRE KIT
Your ZIP WIRE KIT can become the centerpiece of family fun and gatherings:
- Themed Parties: Host outdoor parties where the zip line serves as a major attraction. Choose a theme to enhance the festivities.
- Family Fitness Events: Encourage active family time by organizing physical challenges that revolve around the zip line and other outdoor activities.
- Adventure Camps: Use the zip line as an engaging feature during family camping trips in your backyard.
Planning Events Centered Around Your ZIP WIRE KIT
Consider hosting events focused on your ZIP WIRE KIT:
- Kids’ Birthday Parties: Rent your yard for children’s parties, allowing them to enjoy the thrill of zip lining in a safe environment.
- Community Events: Organize local community gatherings that feature the zip line, combining it with outdoor games and activities.
- Adventure Workshops: Host workshops teaching attendees about safety practices and maintenance of zip lines.